

Welcome to the website of Jim The Truck, documenting his development and (currently) the adventures he takes his occupants on.
Thursday, 20 September 2012
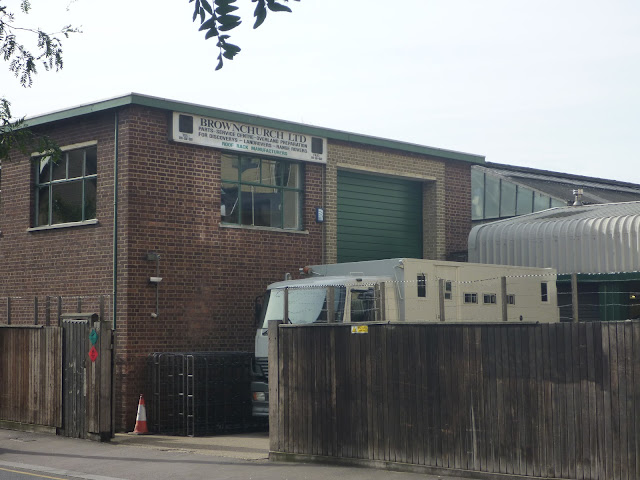
Can you guess what it is yet?
Jim is away for a couple of days and will look a little different when he comes back

Wednesday, 19 September 2012
Nearside bench seat construction
The latest job I have been working on has been the nearside bench seat at the front end of Jim.
As with most things in Jim, the construction of a seat is not as simple as one would hope. Even for a chronically procrastinating (over) engineer such as myself, I would struggle to spend more than a day or two building a bench seat in my house; however the massively limited space in Jim, means that the bench has to serve several purposes, and consequently I have already invested about four full days in it, with at least one or two more required before I am ready to upholster it.
The offside bench is the longer of the two (the nearside is curtailed by the entry door) but about two thirds of the offside bench is occupied by the leisure batteries, and so there is actually more usable space on the nearside bench on which I have been working. With the prospect of a large empty square box, I quickly decided on approximately 14.23 million uses for the space, several million of which have now been ruled out on the grounds of the lack of space. The key items now using the space include:
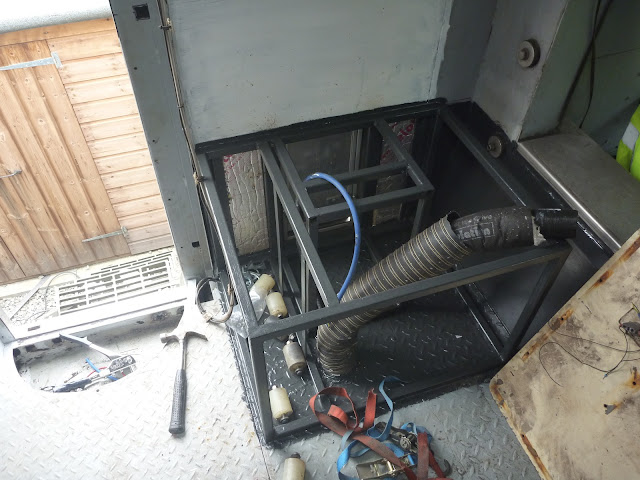
As with all of the major furniture, construction is based around a steel frame, clad in laminated plywood. I built the frame a few months back, but didn't want to order in 1 sheet of laminated plywood as I would have had to have paid for delivery, and so I have had the empty steel frame looking forlorn in the corner for a while. The frame is made from 25mm box section steel; in most areas of the truck I am using the thinnest wall section available (2mm?), but I may fit a seatbelt to this seat and so I used a slightly thicker wall section.
As with most things in Jim, the construction of a seat is not as simple as one would hope. Even for a chronically procrastinating (over) engineer such as myself, I would struggle to spend more than a day or two building a bench seat in my house; however the massively limited space in Jim, means that the bench has to serve several purposes, and consequently I have already invested about four full days in it, with at least one or two more required before I am ready to upholster it.
The offside bench is the longer of the two (the nearside is curtailed by the entry door) but about two thirds of the offside bench is occupied by the leisure batteries, and so there is actually more usable space on the nearside bench on which I have been working. With the prospect of a large empty square box, I quickly decided on approximately 14.23 million uses for the space, several million of which have now been ruled out on the grounds of the lack of space. The key items now using the space include:
- A central heating radiator and the associated flow and return plumbing
- The electrical locker, including power in and out and basic incomer protection
- An air outlet duct from an air heater
- A power amplifier to run the speakers I blogged about previously
- A mounting point for a swing away table , and
- a rail on which to rest a bed base on which guests can sleep (or me when I've been kicked out of the marital sack)
As with all of the major furniture, construction is based around a steel frame, clad in laminated plywood. I built the frame a few months back, but didn't want to order in 1 sheet of laminated plywood as I would have had to have paid for delivery, and so I have had the empty steel frame looking forlorn in the corner for a while. The frame is made from 25mm box section steel; in most areas of the truck I am using the thinnest wall section available (2mm?), but I may fit a seatbelt to this seat and so I used a slightly thicker wall section.

Tuesday, 18 September 2012
Finishing off the bathroom
There were a few outstanding jobs to finish on the bathroom I built recently, which I have now mostly completed.
The bathroom extractor fan was doing a good impression of an aeroplane on the thin plastic cabinet that I mounted it on, and so I fixed a piece of 6.5mm plywood to the back of the cabinet to damp the rattling. I fixed the plywood in place with (more) Sikaflex 221, and used longer mounting screws for the fan which extended into the sheet of plywood. The sound is now much better and with the door of the bathroom closed, the sound is almost inaudible from outside. I didn't take any photos sadly, but if you imagine a square piece of plywood with a circular hole in the middle of it, you'll have a good idea of what it looked like.
The next job was to clad the back wall of the bathroom. Using the same template technique, I cut out a piece of 12mm multiwall and stuck it the steel frame of the bathroom. I then used a piece of quadrant trim to make a nice transition to the side wall of the bathroom.
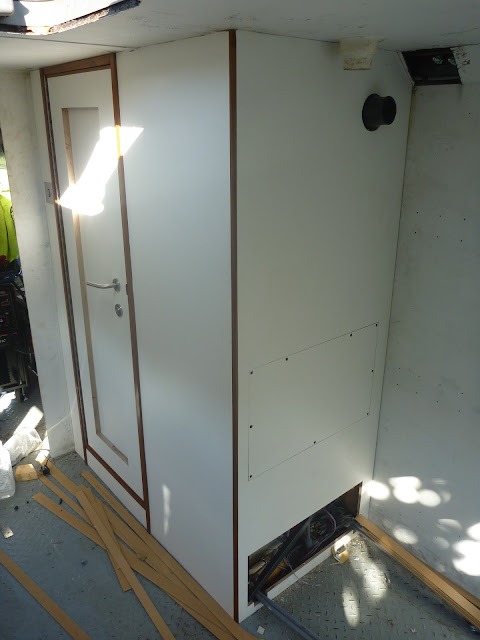
I left two access hatches in this panel, the top one is to access the tap connections and basin waste, in case I need to change the bathroom taps or clean clumps of hair and vomit out of the waste trap. The bottom hatch is to access the connection to the toilet, and all of the elbows and tees for the radiator, shower, toilet and taps. Where possible I will leave access to plumbing connections in case of disaster, but in some cases it will be impractical or impossible. I had intended to make access panels for both hatches, but the bottom cut-out will be hidden in an enclosed box housing an air conditioner, and so there is little value in putting a panel here. In the photo below you can see the plumbing connections for the hot and cold water, and the flow and return to the radiator, and the electrical connections for the toilet and extractor fan.

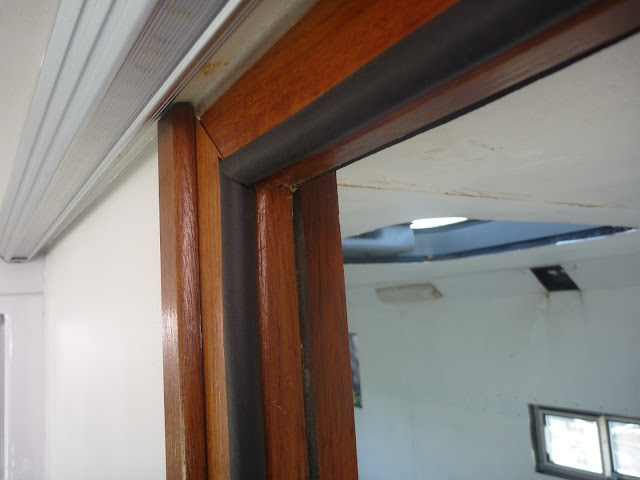
Another job that I finished off was the seal around the bathroom door. The sponge seal I had previously fitted will help, but despite my best intentions, it does not make contact with the door around the whole frame. To further prevent water leaking out of the shower, and to prevent the requirement for a shower curtain, which will inevitably go mouldy and try to molest me every time I get showered, I fitted a hollow bulb seal on the inside bevelled edge of the door frame.

I still have to fit a trap and waste pipe to the basin, and a mirror to the outside of the door, but this pretty much concludes the work on the bathroom.
The bathroom extractor fan was doing a good impression of an aeroplane on the thin plastic cabinet that I mounted it on, and so I fixed a piece of 6.5mm plywood to the back of the cabinet to damp the rattling. I fixed the plywood in place with (more) Sikaflex 221, and used longer mounting screws for the fan which extended into the sheet of plywood. The sound is now much better and with the door of the bathroom closed, the sound is almost inaudible from outside. I didn't take any photos sadly, but if you imagine a square piece of plywood with a circular hole in the middle of it, you'll have a good idea of what it looked like.
The next job was to clad the back wall of the bathroom. Using the same template technique, I cut out a piece of 12mm multiwall and stuck it the steel frame of the bathroom. I then used a piece of quadrant trim to make a nice transition to the side wall of the bathroom.

I left two access hatches in this panel, the top one is to access the tap connections and basin waste, in case I need to change the bathroom taps or clean clumps of hair and vomit out of the waste trap. The bottom hatch is to access the connection to the toilet, and all of the elbows and tees for the radiator, shower, toilet and taps. Where possible I will leave access to plumbing connections in case of disaster, but in some cases it will be impractical or impossible. I had intended to make access panels for both hatches, but the bottom cut-out will be hidden in an enclosed box housing an air conditioner, and so there is little value in putting a panel here. In the photo below you can see the plumbing connections for the hot and cold water, and the flow and return to the radiator, and the electrical connections for the toilet and extractor fan.

Another job that I finished off was the seal around the bathroom door. The sponge seal I had previously fitted will help, but despite my best intentions, it does not make contact with the door around the whole frame. To further prevent water leaking out of the shower, and to prevent the requirement for a shower curtain, which will inevitably go mouldy and try to molest me every time I get showered, I fitted a hollow bulb seal on the inside bevelled edge of the door frame.


I still have to fit a trap and waste pipe to the basin, and a mirror to the outside of the door, but this pretty much concludes the work on the bathroom.
Thursday, 13 September 2012
Jimless interlude
It's been a while since I last blogged, this is mostly because I've been busy enjoying non-truck related things, including very loud reggae at Notting hill, followed by a week on the beach near Lacanau in South West France

I've managed to get a bit of time in on the truck, but I've spent the day trying to avoid vomiting whilst the world spins so I'll do a detailed post tomorrow.
Here's a preview of the progress on the nearside bench seat base, to house a radiator and associated plumbing, an electrical input and output locker and associated wiring, a hot air outlet for an Eberspacher heater, a 12 inch subwoofer and a power amplifier for the sub.


I've managed to get a bit of time in on the truck, but I've spent the day trying to avoid vomiting whilst the world spins so I'll do a detailed post tomorrow.
Here's a preview of the progress on the nearside bench seat base, to house a radiator and associated plumbing, an electrical input and output locker and associated wiring, a hot air outlet for an Eberspacher heater, a 12 inch subwoofer and a power amplifier for the sub.

Thursday, 30 August 2012
The Water Closet
Having a toilet and bathroom in a motorhome is something which divides some people. Many travellers find the idea disgusting, whilst others wouldn't travel without one. For my money, that single occasion where you wake up at 3am, you're parked in a town centre, its absolutely pissing down, and the dodgy meal you ate has given you less than 2 minutes before you thoroughly embarrass yourself, makes it worth carrying a crapper around with you. It might waste precious floor space, it might smell if you haven't emptied it for a while, and it might not be the porcelain throne you are used to reading the Sunday paper on. However, if on one single occasion it saves you having to crouch behind a bus stop in your pyjamas, in a hurricane, with a bunch of taxi drivers staring at you in horrification, it is definitely worth it.
With that in mind, one of the first major thing pieces of work I did on the inside of Jim was to install the bathroom. However, given that I might only use the room once or twice a day, I was loath to make it any bigger than absolutely necessary, and set about planning it to make it as small as possible, whilst still being usable.
Below is the space I started with, after installation of a window to add some light, and the hatch to allow me to empty the toilet without having to drag the excrement filled cassette through the living space, which would be a step to far even by my low standards of hygiene.

With this in mind, I designed the room around the footprint of a Thetford cassette toilet and matching shower tray, designed for use in small caravans. In addition to these items, the room needed to house, a sink, a storage cabinet, a radiator, and a shower; all in a space noticeably smaller than the cupboards I use at home to keep my clothes in. Which is why I thought that Water Closet was a surprisingly appropriate name, although my closets at home are significantly larger than the space I had allowed in Jim to shower, shave and sh...
With that in mind, one of the first major thing pieces of work I did on the inside of Jim was to install the bathroom. However, given that I might only use the room once or twice a day, I was loath to make it any bigger than absolutely necessary, and set about planning it to make it as small as possible, whilst still being usable.
Below is the space I started with, after installation of a window to add some light, and the hatch to allow me to empty the toilet without having to drag the excrement filled cassette through the living space, which would be a step to far even by my low standards of hygiene.

With this in mind, I designed the room around the footprint of a Thetford cassette toilet and matching shower tray, designed for use in small caravans. In addition to these items, the room needed to house, a sink, a storage cabinet, a radiator, and a shower; all in a space noticeably smaller than the cupboards I use at home to keep my clothes in. Which is why I thought that Water Closet was a surprisingly appropriate name, although my closets at home are significantly larger than the space I had allowed in Jim to shower, shave and sh...
Saturday, 25 August 2012
Dogs and ladders
Dogs are generally awesome, and mine is certainly no exception. Boris (our golden retriever) makes a great tofu stir fry, and can recall Pi to 47 decimal places, but sadly one of the things Boris cannot do is climb ladders.
The first time this became a problem was when I was visiting a friend on his boat at low tide; the gangway was too steep and Boris flatly refused to lose his dignity trying to descend it. On this occasion Boris retired to the car whilst I demonstrated my agility to him.
More recently I noticed that Boris's ladder issue would become a problem when we started travelling in Jim, as the only easy access is via the nearside door in the box body, entered using steps recessed into the side guard.
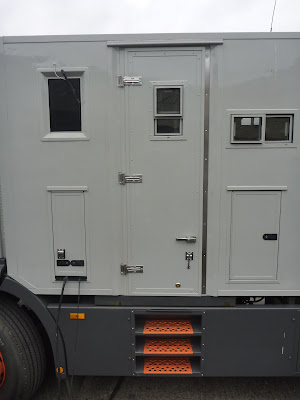
I've often laughed at the array of bulky and expensive solutions many motorhomes and traveller vehicles use to make entering the vehicle easier - electric steps that mean you have to lift your foot 4cm less when getting into a van, huge wooden ladders strapped to the bumper when travelling. Of course there are also many elegant solutions, such as steps that fold away into the bodywork, or entry doors that fold downwards to form a staircase, but these seem to be limited to manufacturers of expensive overland trucks .
I'd previously not given the entry of the truck much thought. The steps in the body work are easy to use for a biped with opposing thumbs, but realising that I needed to make a dog friendly solution I started looking around for a cheap and effective solution that worked well when parked but also didn't pose a headache when travelling.
Having spent many occasions lusting after old army trucks in the past, I had seen the UK MOD communications body trucks with their well built aluminium steps fixed to the back. The steps looked tough enough for a life on the road, and if they don't fly off and kill someone when the army are throwing their vehicles around off-road, I was sure they'd be fine on Jim. The steps are made from pressed and cast aluminium components (thus fairly light) and have adjustable legs that allow them to be used on various vehicles and on non level ground, perfect. With this in mind, and having waited many years for a valid excuse, I went up to the next Witham Specialist Vehicle Tender. For those not afflicted with incurable mechanophilia (sadly I didn't make that term up!), you may not have come across Witham, but for people like me, it is the equivalent of Mecca. Witham have the sole right to sell every vehicle disposed of by the armed forces in the UK, and consequently the place is rammed full of vehicles that leave me weak at the knees.

Witham aren't in the business of selling small cheap items, and so the only way of buying a set of the aluminium steps was to bid on a lot of 8. I don't suppose there is much demand for these steps if they don't come attached to a truck, and so I won the lot. Some of them were irreparably mangled, some of them needed a of tweaking, and a few were practically unused.
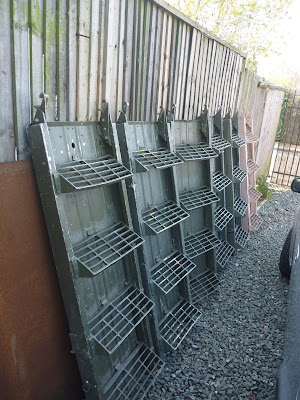
I kept a pair of good ones for myself and sold some of the rest, covering most of the cost of buying them and picking them up. I've got three pairs needing a bit of work left; if anyone want them, you can have them for a bottle or two of something tasty.
Unfortunately, this was the easy bit over.
The first time this became a problem was when I was visiting a friend on his boat at low tide; the gangway was too steep and Boris flatly refused to lose his dignity trying to descend it. On this occasion Boris retired to the car whilst I demonstrated my agility to him.
More recently I noticed that Boris's ladder issue would become a problem when we started travelling in Jim, as the only easy access is via the nearside door in the box body, entered using steps recessed into the side guard.

I've often laughed at the array of bulky and expensive solutions many motorhomes and traveller vehicles use to make entering the vehicle easier - electric steps that mean you have to lift your foot 4cm less when getting into a van, huge wooden ladders strapped to the bumper when travelling. Of course there are also many elegant solutions, such as steps that fold away into the bodywork, or entry doors that fold downwards to form a staircase, but these seem to be limited to manufacturers of expensive overland trucks .
I'd previously not given the entry of the truck much thought. The steps in the body work are easy to use for a biped with opposing thumbs, but realising that I needed to make a dog friendly solution I started looking around for a cheap and effective solution that worked well when parked but also didn't pose a headache when travelling.
Having spent many occasions lusting after old army trucks in the past, I had seen the UK MOD communications body trucks with their well built aluminium steps fixed to the back. The steps looked tough enough for a life on the road, and if they don't fly off and kill someone when the army are throwing their vehicles around off-road, I was sure they'd be fine on Jim. The steps are made from pressed and cast aluminium components (thus fairly light) and have adjustable legs that allow them to be used on various vehicles and on non level ground, perfect. With this in mind, and having waited many years for a valid excuse, I went up to the next Witham Specialist Vehicle Tender. For those not afflicted with incurable mechanophilia (sadly I didn't make that term up!), you may not have come across Witham, but for people like me, it is the equivalent of Mecca. Witham have the sole right to sell every vehicle disposed of by the armed forces in the UK, and consequently the place is rammed full of vehicles that leave me weak at the knees.

Witham aren't in the business of selling small cheap items, and so the only way of buying a set of the aluminium steps was to bid on a lot of 8. I don't suppose there is much demand for these steps if they don't come attached to a truck, and so I won the lot. Some of them were irreparably mangled, some of them needed a of tweaking, and a few were practically unused.

I kept a pair of good ones for myself and sold some of the rest, covering most of the cost of buying them and picking them up. I've got three pairs needing a bit of work left; if anyone want them, you can have them for a bottle or two of something tasty.
Unfortunately, this was the easy bit over.
Friday, 24 August 2012
Continuing work on the speakers
I've got both speakers painted now as the weather has been pretty good in London. I did one coat
of primer, 3 coats of undercoat, and 3 coats of satin. The finish is
pretty smart and it'll fit in nicely with the white interior I'm putting
in Jim. The panels I'm lining Jim with and building the furniture out of are laminated plywood; I considered building the speakers out of the same material but I wouldn't have been able to produce the curved section as the polypropylene laminate would have either cracked or prevented me from getting the tight radius. I'd have also felt obliged to cover the plywood edges with teak mouldings as I'm doing elsewhere, which is pretty absurd even by my massively opulent standards.
I've had the time to load the driver
and fit the hardware to one of boxes .


I haven't
installed the headunit or amps into Jim yet, but I
had a chance to listen to the one I loaded yesterday in the house with my hi-fi. I tested the speaker off of a
Crown DC300 amplifier which puts out a maximum of about 175w per channel at the 8ohm load this speaker presents . First impressions are great, the sound is
awesome and f*ck me does it go loud. I may have tuned it a little high
as it doesn't go as low as I expected, at a guess I'd say it starts
rolling off about 70hz, but I'll play around with the ports this
weekend.
Playing it alongside one of my bookshelf hifi speakers, it sounds clearer, without the boomy bass and missing midrange that a lot of small hifi speakers have. It doesn't go as low but the hifi speaker was making death noises when this speaker was only just getting warmed up! I threw most of one side of the amp into it and I got scared before it showed any signs of distress. Both of these together in Jim will be able to go louder than I'll ever need for sure, and plenty loud enough to drown out the 230 horses screaming under the cab when crawling at high revs up long ascents.
Playing it alongside one of my bookshelf hifi speakers, it sounds clearer, without the boomy bass and missing midrange that a lot of small hifi speakers have. It doesn't go as low but the hifi speaker was making death noises when this speaker was only just getting warmed up! I threw most of one side of the amp into it and I got scared before it showed any signs of distress. Both of these together in Jim will be able to go louder than I'll ever need for sure, and plenty loud enough to drown out the 230 horses screaming under the cab when crawling at high revs up long ascents.
Here's a brief video to give you an idea of the sound. The camera mic was distorting when I got too close. I apologise for the wonky view and explicit music! I hadn't realised the track was quite so offensive until I listened back! Send your kids out of the room before you listen to the clip!
Subscribe to:
Posts (Atom)