The first time this became a problem was when I was visiting a friend on his boat at low tide; the gangway was too steep and Boris flatly refused to lose his dignity trying to descend it. On this occasion Boris retired to the car whilst I demonstrated my agility to him.
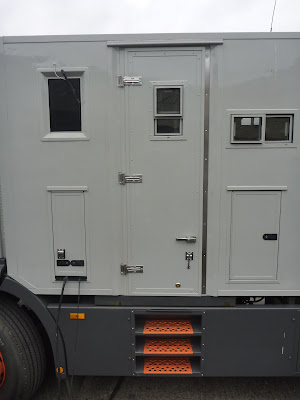
More recently I noticed that Boris's ladder issue would become a problem when we started travelling in Jim, as the only easy access is via the nearside door in the box body, entered using steps recessed into the side guard.
I've often laughed at the array of bulky and expensive solutions many motorhomes and traveller vehicles use to make entering the vehicle easier - electric steps that mean you have to lift your foot 4cm less when getting into a van, huge wooden ladders strapped to the bumper when travelling. Of course there are also many elegant solutions, such as steps that fold away into the bodywork, or entry doors that fold downwards to form a staircase, but these seem to be limited to manufacturers of expensive overland trucks .
I'd previously not given the entry of the truck much thought. The steps in the body work are easy to use for a biped with opposing thumbs, but realising that I needed to make a dog friendly solution I started looking around for a cheap and effective solution that worked well when parked but also didn't pose a headache when travelling.
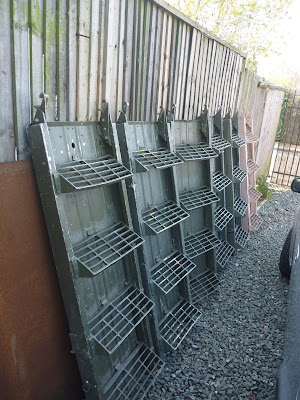
Having spent many occasions lusting after old army trucks in the past, I had seen the UK MOD communications body trucks with their well built aluminium steps fixed to the back. The steps looked tough enough for a life on the road, and if they don't fly off and kill someone when the army are throwing their vehicles around off-road, I was sure they'd be fine on Jim. The steps are made from pressed and cast aluminium components (thus fairly light) and have adjustable legs that allow them to be used on various vehicles and on non level ground, perfect. With this in mind, and having waited many years for a valid excuse, I went up to the next Witham Specialist Vehicle Tender. For those not afflicted with incurable mechanophilia (sadly I didn't make that term up!), you may not have come across Witham, but for people like me, it is the equivalent of Mecca. Witham have the sole right to sell every vehicle disposed of by the armed forces in the UK, and consequently the place is rammed full of vehicles that leave me weak at the knees.
Witham aren't in the business of selling small cheap items, and so the only way of buying a set of the aluminium steps was to bid on a lot of 8. I don't suppose there is much demand for these steps if they don't come attached to a truck, and so I won the lot. Some of them were irreparably mangled, some of them needed a of tweaking, and a few were practically unused.
I kept a pair of good ones for myself and sold some of the rest, covering most of the cost of buying them and picking them up. I've got three pairs needing a bit of work left; if anyone want them, you can have them for a bottle or two of something tasty.
Unfortunately, this was the easy bit over.
The hooks at the top of the steps didn't have anything to hook onto by the entry door in Jim, and there was no easy place to store the steps whilst travelling.
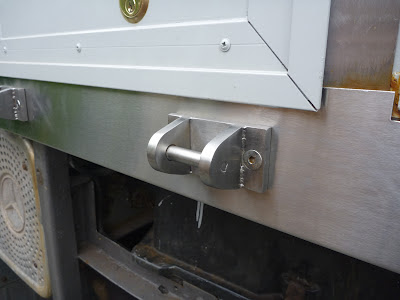
Not having seen the way in which the steps attach to the army trucks, I had to design my own fixing; as it turns out, the fixing I designed is pretty similar to those used by the army, albeit rather chunkier. Given the frequency with which the steps will be attached and detached from the fixings, I wanted them made from aluminium or stainless steel, as the paint on mild steel would quickly get chipped off, leaving big rusty streaks down the bodywork. Not having the gas to weld stainless, or a TIG machine to weld aluminium, I took the drawings to a local fabricator who made them for me.
Being in London makes certain aspects of the work I'm doing on Jim awkward. I have no space to work except my small back garden, and with numerous neighbours surrounding my house, power tool use has to be restricted to sociable hours. However one element which is a joy, is the massive abundance of suppliers and craftsmen within a few minutes drive. If I need more welding wire or some stainless bolts, I don't have to travel more than half a mile, and can pick them up 7 days a week, often until 9pm. Equally if I want some aluminium welded, or some wood planed to size, I have a choice of places I can go without having to drive more than 10 minutes.
At the same time as fabricating the brackets, I got my local welder to fold up a cover panel, to cover the rusty steel box section beneath Jim's entry door. I glued the cover panel in place using Sikaflex 221 (my 24,769th tube), and bolted the brackets in place using countersunk M8 socket bolts. Having suffered the wrath of VOSA at testing time before, for using the wrong type of bolts to hold the side guards on, I wanted to make the brackets removable incase they take offence at the fatal risk they pose to pedestrians.
The photos below show the brackets and cover panel fitted, with the side guards removed to help me fit them.
With the legs adjusted to get the steps at the right angle, they work well, and I can see them being extremely useful if I come back to the truck completely hammered. Sadly the open tread pattern doesn't meet with Boris's approval, he claims to be worried about breaking his nails. I'll put some grip tape over the treads if I can't persuade him to stop behaving like a small girl.
With the solution for the steps when parked sorted, I turned my head to storing the steps whilst travelling. I didn't want to store the steps inside, as it would make accessing them awkward and they will often be stored when wet and muddy. That really only left the back of the truck or the front of the truck as easy places to store them. I opted for the back. The powered tail-lift on Jim lets me lower the steps to the ground in seconds and, and provided a big flat area on which to mount suitable brackets. The only disadvantage is that in the lowered position, the steps and brackets now prevent the tail-lift from reaching the floor by about 20cm. This is no bother to me as the storage area at the back of the truck is now not big enough to store anything which can't be lifted 20cm onto the platform.
I welded the brackets up from M24 bolts with the heads and thread cut off, which saved me having to buy a full length of 24mm rod, and a piece of 8mm plate I scavenged from pieces I cut out of the truck when decommissioning it as a cash-in-transit truck. Using bolts also had the advantage that the pieces are galvanised, and so as I slide the steps on and off, they are less likely to corrode. I made four of these brackets and bolted them to the tail lift with M8 holes I tapped.
I then drilled holes in the corresponding places in the steps and reinforced the areas around the hole with small 3mm aluminium plates cut from a piece of Jim's roof removed when I fitted a skylight.
All that was left to do was provide a way to secure the steps to Jim, so that they did not fly into the windscreen of the person following on the first pothole. I killed two birds with one stone by using a padlock to secure the steps to the tail-lift; it prevents the steps falling off and prevents someone walking off with them. The padlock I used is the kind used to secure van doors in places with a lot of tea leaves; it is unnecessary in terms of security but works well as a restraint. The hasp is made from the same 8mm plate used to make the brackets, doubled up for the piece which mates with the padlock.
As a final touch, I attached some small rubber blocks to the tail lift to stop the steps scratching the paintwork every time I take them off.
Another job completed. All that is left to do now is paint the steps to match Jim.


No comments:
Post a Comment