As with most things in Jim, the construction of a seat is not as simple as one would hope. Even for a chronically procrastinating (over) engineer such as myself, I would struggle to spend more than a day or two building a bench seat in my house; however the massively limited space in Jim, means that the bench has to serve several purposes, and consequently I have already invested about four full days in it, with at least one or two more required before I am ready to upholster it.
The offside bench is the longer of the two (the nearside is curtailed by the entry door) but about two thirds of the offside bench is occupied by the leisure batteries, and so there is actually more usable space on the nearside bench on which I have been working. With the prospect of a large empty square box, I quickly decided on approximately 14.23 million uses for the space, several million of which have now been ruled out on the grounds of the lack of space. The key items now using the space include:
- A central heating radiator and the associated flow and return plumbing
- The electrical locker, including power in and out and basic incomer protection
- An air outlet duct from an air heater
- A power amplifier to run the speakers I blogged about previously
- A mounting point for a swing away table , and
- a rail on which to rest a bed base on which guests can sleep (or me when I've been kicked out of the marital sack)
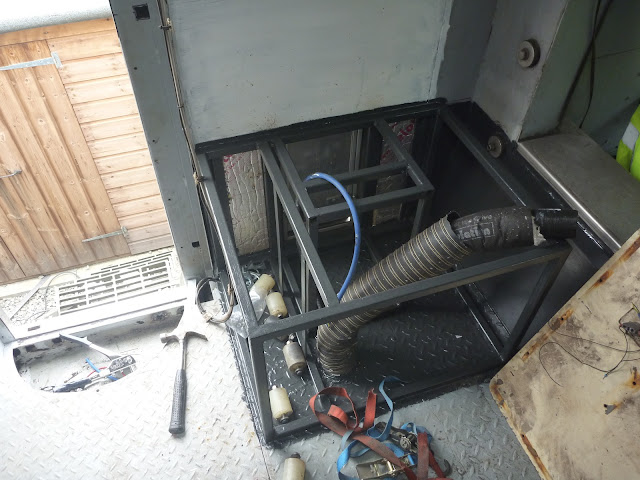
As with all of the major furniture, construction is based around a steel frame, clad in laminated plywood. I built the frame a few months back, but didn't want to order in 1 sheet of laminated plywood as I would have had to have paid for delivery, and so I have had the empty steel frame looking forlorn in the corner for a while. The frame is made from 25mm box section steel; in most areas of the truck I am using the thinnest wall section available (2mm?), but I may fit a seatbelt to this seat and so I used a slightly thicker wall section.
As with all seats, the primary purpose it to provide something to sit on. In this case it will be where we eat our meals, use the computer, plan our routes, and generally relax. Serving so many sitting functions, meant that I had to carefully to size and proportion the bench; everybody likes slumping into a deep and low sofa when relaxing, but the same position is not conducive to a good a meal, and massively increases the chances of wearing your food. The compromise I came to was a tall but deep seat. Tall enough to comfortably eat on without my meal being at the mercy of Boris's grinning, greedy face, and deep enough to slouch into; nobody likes the experience of sitting at a church pew, particularly if it doesn't increase your chances of avoiding a fiery pit of eternal damnation.
The seat base is approximately 50cm tall, and 60cm deep, although this is without base cushions and back cushions. I would have preferred to have made it slightly lower and slightly less deep, but the offside bench was built to these dimensions accommodate the large leisure batteries, and so I kept the nearside bench the same size in the interest of keeping it all symmetrical.
The first item to go into the seat base was a 400mm x 400mm, double panel radiator, fitted into the exposed end of the bench, and forming another part of the central heating system.
The radiator was boxed in using 9mm multiwall on the back and sides, and 6.5mm on the base. The brackets for the radiator are the standard domestic type, like hooks onto which tabs on the back of the radiator are lowered. With only 450mm between the top and bottom of the steel frame, I would have been unable to drop the radiator onto it's brackets if I'd used thicker material for the base. I had integrated two sections of 6mm thick flat-bar into the steel frame, into which the brackets are bolted. Rather than using nuts behind the flat bar, I chose to thread the bar itself, as It will be very difficult to access the back of this panel once the other equipment is installed.
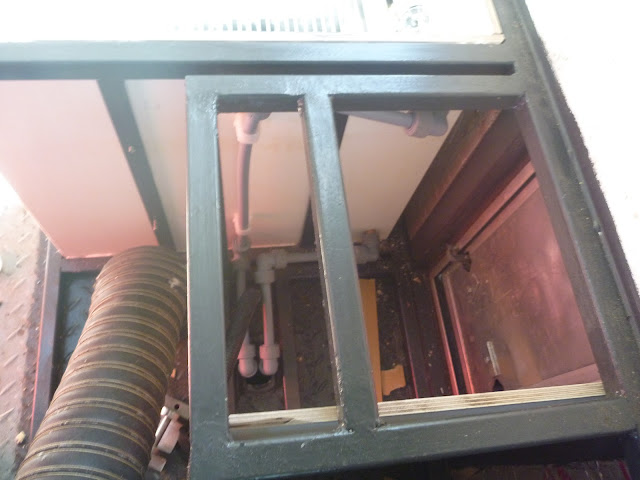
The radiator, like the one I fitted, in the bathroom, will ultimately run off of a Webasto water heater which has cluttering up my living room for a few years. The plan is to fit the Webasto unit into the storage area I have created in the space under the entrance door which once housed the equipment for the revolving security door. I have welded in a section of 75mm x 50mm steel box either side of the storage area connecting it to the floor either side of the entrance door, and so the plumbing for the radiator runs down this conduit. Sorry for the terrible photo!
Next to go into the bench base was the electrical locker. When I bought Jim, he was fitted with a stainless steel revolving drum, adjacent to the entrance door, and visible in the old photo below, taken shortly after I bought the truck
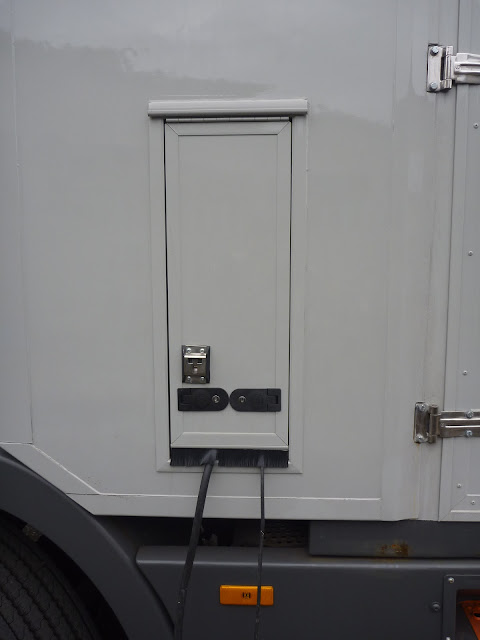
The revolving drum was extremely heavy, extremely bulky, and extremely useless for any purpose in a motorhome, and so it was one of the first things I removed; following which I was left with a large hole in the side of the truck. Before I had decided what I was going to do with the hole, and for far longer than it should have been, the hole was covered by a rubble bag and a load of gaffa tape. Ultimately I decided to use the aperture to house a small electrics locker, and so the hole was filled with a locker door.
As is the way, the aperture left by the revolving drum was far higher than I needed. The electrics locker has to extend into the truck by about 30cm to accommodate all the necessary equipment, this is no problem in the area under the bench seat, but would have formed an unsightly protrusion above the seat. Rather than try to fill-in the top half of the aperture, I fitted a door the full height of the aperture and blocked off the top half of the opening from the inside, so that when you open the locker from the outside, the top half is completely blanked off and unused. This is seen below as the area painted white above the bench base.
Using an idea I plagiarised from an outdoor broadcast truck, a narrow slot was left at the bottom of the locker, covered by a brush strip, through which cables can pass. It allows me to plug the truck into a power supply, and lock the door so that even if the cable can be unplugged, the aperture is too small for the connector to be pulled through and the cable stolen.
The area behind the locker will have a power inlet and two power outlets, but also have sufficient space for me to to store a long cable which I can use to plug Jim in when mains power is available. I have begun to box out the inside of the electrics locker using 9mm multiwall and have fitted a 32 amp power inlet, a 16 amp and 13 amp power outlet, and a small consumer unit to provide overcurrent and earth leakage protection to the cable between the power inlet, and the mains consumer unit.
The 32a power inlet is likely to be larger than necessary in most cases, as very few places I park will be able to provide that much power. My reasoning for it is that when there is a 32a supply available, I may as well be able to use it. When heating the water with an immersion heater, running a small electric fan heater, and charging the batteries from the mains charger, I will be pulling approximately 19a, too much 16a socket.
The power inlet is protected by it's own small consumer unit. The mains circuits in Jim are served by their own larger consumer unit, fitted in the main electrical cabinet; this smaller unit is simply to provide protection to the cable between the main consumer unit, and wherever I have plugged in. If I could be sure that whichever power supply I was plugged into, had suitable overcurrent protection on the outlet, the small consumer unit would be unnecessary; as it is there are likely to many instances where the power supply has no suitable protection at all. The overcurrent device (MCB) in the small consumer unit, prevents more than 32a from being pulled through the power inlet; protecting the cable and connectors. This essentially replaces the main incomer fuses you get in all domestic and commercial properties in the UK. The earth leakage protection device (RCD) in the smaller consumer unit is probably superfluous as all circuits in Jim are on their own RCDs, and may end up being a nuisance if it trips before the main RCDs in the primary consumer unit. I may in time replacing this with a an isolator switch.
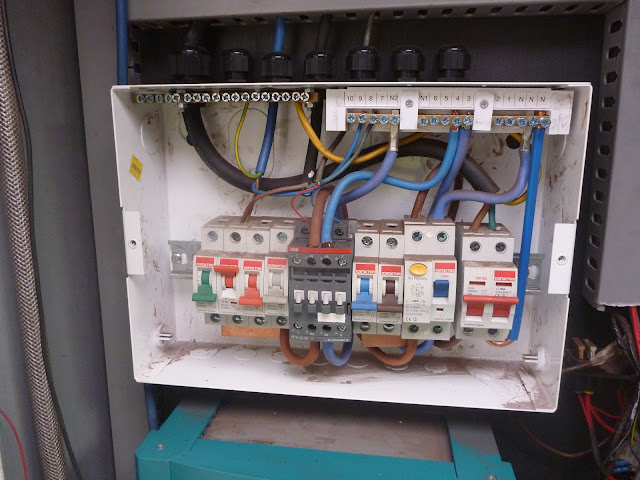
The other two connectors in the electrics locker are power outlets, to provided mains power in cases where I want to use tools or other equipment outside the truck. The primary consumer unit in the main electrical cabinet - shown in a dirty, exposed state below - is split into two sections, one is run directly from the mains power supply, whichever it may be (inverter, generator or grid AC), and the other passes through a contactor which disconnects the circuits when the inverter is providing power. This prevents high power items such as an air conditioner or an immersion heater, from running the batteries down, or overloading the inverter, and prevents the mains battery charger from trying to charge the batteries with power taken from the same batteries (a loop of wasted power).
The 13a socket in the electric locker is powered from any circuit which will allow me to run low power items outside the truck from the inverter, or any power source. The 16a socket is on the other bank, meaning that it is only energised when grid AC is available, or the generator is operating. There is nothing stopping someone plugging a 3000w power tool into the 13 socket and overloading the 1,200w inverter, but most of the time it will be only me using the socket.
I still have a little work to do on the electric locker, wiring up the power outlets and finishing cladding it from the outside, but these can wait.
After the work on the electrics locker, the next job was fitting the power amplifier in its place. I had previously bought a cheap 12v amplifier to use through a 24v to 12v dropper, but recently some decent 24v amps came up on ebay and so I scrapped that plan. The leisure battery bank in Jim is 24v, and to keep cable runs light, and reduce conversion inefficiencies, I am trying to run as much of the electrical equipment as possible directly from the 24v supply. I have installed a 24v to 12v dropper in the main electrical cabinet for items which are unavailable in 24v form (the toilet, the ignition on the hob and oven, etc), but the dropper is not 100% efficient and so it will use more power to operate the same item running straight from 24v. The amp I am using is a Pyle PLTA180.
I wanted to fit the amp at the front of the bench base, directly to the front wall of Jim. My plan was to drill through the single skin steel wall and bolt the amplifier directly to it, but as is often the case when working on Jim, it was not to be that simple. Most of the inside of Jim is lined with a thin sheet of steel and a thin sheet of aluminium; however the front quarter, which was previously the operators area, directly behind the cab, is lined with a an armour steel. It looks like mild steel, rusts a little if exposed, and welds OK, but try to drill it or machine it, and you realise it is not the same at all. I have had terrible success to date drilling this material and this job was no different. Solid carbide bits are hard enough to drill the steel, but they are so brittle that the corners of the bit chip off and I am lucky to get more than two holes out of these expensive bits. The carbide tipped bits I have tried just polish the surface, and I have not managed more than a few mm out of cobalt bits before they blunt. Titanium nitride coatings seem to help a little but I am now tired of experimenting with expensive drill bits. In cases like this where I have access to the back of the hole, I decided that it would be quicker to cut a small hole with the plasma cutter. It probably sounds like overkill but was far quicker than trying to drill this material and with a steady hand I got four neat holes, even for a 6mm bolt.
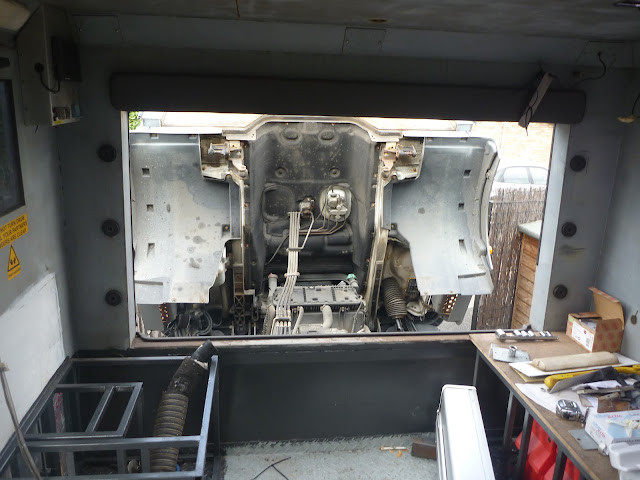
To get to the back of the holes for the amplifier bolts, I have to tilt the cab forward to gain access. On most trucks of this size, this is no more complicated than pumping the hydraulic pump which jacks forward the cab, but as the cab and box body on Jim are connected, the cab is secured to the box using eight large bolts which must first be removed. It's not a huge job, but it can't be done when it's raining as water will get into the living accommodation, and after reversing the procedure it always comes out a half hours job. Below is the uncanny view you get looking towards the cab when it is tilted forward.
To avoid having to tilt the cab if I ever have to remove the amplifier, I pushed some M6 bolts through the holes I had cut, and welded the heads to the front of the box. This means that I do not need to get a spanner on the head of the bolt to fix the amplifier in place. I simply drop the amplifier over the exposed studs and tighten some nuts down. The amplifier is shown in the photo below, fixed in place with the cab returned to its rightful position.

The next job was to build the subwoofer to occupy the remaining internal volume. There is an iron rule in subwoofer design which says that of the following three factors, you can only have two of them:
- Small enclosure
- Low frequency reproduction
- high efficiency
For reasons which are not obvious to me, manufacturers of car audio speakers value huge power ratings, and reproduction of inaudible sub bass frequencies over high efficiency and music reproduction, and so I was keen to find a drive unit from the PA world rather than the ICE (in-car-entertainment) world. Most 12 inch car-audio drivers have efficiencies around 87db (with 1 watt measured at 1 meter), whilst it is not uncommon for PA driver to have efficiencies of around 99db. An increase of three decibels requires a doubling of input power to achieve, and so the 87db car audio driver would need 1,600 watts, to achieve the same audible output as the 99db PA driver would achieve with 100 watts! Clearly choosing the appropriate driver is important!
The choice of 12 inch sub bass drivers with decent efficiency is fairly limited; in the end I decided to use the BMS 12S330 driver, wound with a 4ohm voicecoil to allow me to get the most out of the amplifier when only powering one subwoofer. The driver is on its way from Germany.
With the choice of driver out of the way, I set about optimising the enclosure design to maximise efficiency and low frequency output. The driver I chose is unusual for a 12inch driver in that it is naturally able to produce proper sub bass (with equalisation) in fairly small enclosures. I could therefore have made my life easy by building a square box - with the corner cut off to allow the hot air duct to pass - leaving me with an internal volume of approximately 35 litres. This would have been adequate to produce a decent frequency response, but in the interest of maximising the efficiency and sub bass output, I decided to make life difficult for myself, by building an awkwardly shaped box which used all of the available volume. The final design I came up with uses all of the available space, and gets me a net internal volume of around 60 litres.
When I say it was awkwardly shaped, I actually mean that it was a monstrous pain in the arse to build. I have built more complicated speakers in my time, but the assumption when building a simple bass-reflex enclosure is that it will be a square box, with a couple of braces inside, and a few holes in the front. So when this box took a full day to put together, I re-evaluated my decision slightly. The shape is as it is, to fit around all of the other equipment in the bench base: the cut-out on the left to avoid the air duct, the cut-out on the right to avoid the amplifier, the chunk out of the back to avoid the electrics locker, and the slot down the right side to allow me to remove the bottom cab-retaining bolt without having to remove the sub.
The enclosure needed to fit snugly into the available space to avoid the wooden box rattling around in the steel frame when it was turned up, and so I built it with minimal tolerance all round. I think the correct engineering term for the end-result is a 'friction fit', essentially it is as tight as a ducks arse. I had to chamfer the vertical edges to avoid the fillet welds in the corner of the frame, and I had to round over the bottom edges of the box, to direct the enclosure into the steel frame at the bottom of the bench. The fit is so tight that I would have had no chance of getting the box back out without putting decent handles in the top. I had some old flightcase handles left over from a previous project, and given that they will be concealed under the seat cushion, I mounted them in the top of the box, recessed to put them below the surface of the bench. Below is the box in position.
The sub cannot be completed further until the driver arrives. I have a good idea from modelling the enclosure with winISD what length the ports should be, but I will wait until I am able to to test the speaker before cutting them to their final length and fixing them in place.
With this job on hold, I started to build the piece to clad the front of the bench. This panels needs:
- a corresponding cut-out for the subwoofer
- a rail to mount a temporary bed base on
- the mounting plate for a swing out table
- a large vent for the subwoofer and to help the amplifier keep cool, and
- a vent for the hot air duct
I still have a fair bit of work to do on the bench to complete it, but it feels good to be making progress at least.









No comments:
Post a Comment